If you’re hunting for the best MTB upgrades, you want clear, practical advice.
I know that as an urban or suburban rider, you juggle work, school, or freelance deadlines, and you need reliable gear to match your routes, whether that’s paved commutes or rocky trail adventures.
In this guide, I’ll walk you through upgrades that truly move the needle—helping you ride smoother, corner faster, and stop with confidence.
What you’ll learn in this guide:
- Why spending on higher-quality tires gives you better grip, fewer flats, and more comfort
- Which wheels deliver the biggest bang for your buck— and why 29% of riders say wheels matter most
- How simple contact-point swaps (grips, saddles, pedals) reduce fatigue and boost control
- When a tubeless setup pays off, and what you need to do it right
- Why swapping cables and housings restores crisp shifting and prolongs drivetrain life
- Which premium upgrades can make your ride feel like a totally new bike
Below are some quality upgrades to help you avoid the pitfalls of unnecessary changes.

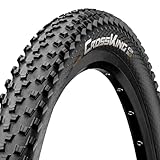
Tires
If you have the budget, you better go tubeless. Upgrading to higher-quality tires remains one of the most effective and affordable MTB upgrades, with proven gains in rolling resistance, grip, puncture protection, and comfort.
Switching from tubes to a tubeless setup lets you run lower tire pressures. That means more cushion on rocky trails, better grip in loose dirt, and far fewer punctures.
In fact, most riders who switch to tubeless and choose tire treads matched to their local terrain—like Maxxis Minion DHF/DHR II—report a drastic drop in flats and tighter cornering.
Tubeless tires have been the go-to wheels for hardcore mountain bikers. This technology enables MTB riders to experience a quality performance from their tires. It is lightweight, has better puncture resistance, and has a self-sealing system.
Aside from these, going tubeless can also reduce your bike’s rolling resistance.
That said, tubeless tires are not exactly cheap. It also has a more complex setup and service compared to tubular tires. More often than not, it would need expert service to set up. It might also need regular servicing to keep it at top performance.
Still, the benefits of going tubeless far outweigh the downsides. If you are an occasional biker, you might not need the performance benefits of these kinds of tires.
But, for riders who frequent the off-road trails, this is a quality upgrade that might save you money in the long run.


Advantages of Tubeless Tires
- Better Puncture Resistance: Fewer pinch flats when you run lower pressure.
- Improved Grip: Lower psi lets the tire conform to obstacles.
- Reduced Rolling Resistance: You roll faster with less effort.
- Light Weight: A tubeless tire and sealant often weigh less than a tube plus tube-type tire.
Drawbacks to Consider
- Higher Upfront Cost: Tubeless-ready tires and wheels cost more.
- Setup Complexity: You need tubeless tape, valves, and sealant. If you lack a floor pump with a tubeless head, you may need an air compressor or pro shop help (Flow Mountain Bike, 2023).
- Maintenance: You’ll top off sealant periodically to keep it sealing small cuts.
Who This Serves: Off-road trail riders who want to cut flats and ride confidently on jagged rock gardens. If you mostly stick to smooth pavement, you might skip tubeless.

Wheels
In a Singletracks survey, 29% of riders said upgrading wheels gave them the biggest performance boost—more than brakes, drivetrain, or suspension (Singletracks, 2024). Swapping out stock wheels for a stiffer, lighter set often delivers instantly noticeable gains. You’ll corner faster, climb easier, and feel more in control.


Why Upgrade Wheels?
- Stiffer & Lighter: Less flex in hard turns. You stay planted when you push into berms.
- Faster Acceleration: High-engagement hubs (from 18 to 90 points of engagement) snap you into power on quick sprints (Singletracks, 2024).
- Durability: Higher-grade rim materials resist dents and cracks on rocky paths.
- More Consistency: Premium bearings spin smoother and last longer.
Considerations Before You Buy
- Rim Width & Tire Compatibility: Wider rims support larger, more stable tires.
- Hub Engagement: Higher engagement gives quicker response off the line—ideal if you sprint a lot.
- Tubeless vs. Tube-Type: Most high-end wheels are tubeless-ready. If you plan tubeless, ensure the rim bed seals with tape.
- Budget Impact: A mid-range wheelset costs $300–$600. High-end carbon wheels can exceed $1,000 (Singletracks, 2024).
Who This Serves: Riders who want sharper handling and quicker acceleration. If you rarely push hard or race, you may not feel as big a difference— but even casual trail riders often notice fewer flats and crisper cornering.

Cockpit (Stem, Handlebar, Grips)
Changing your stem, handlebar, and grips remains one of the cheapest and fastest upgrades you can do. Tweak your cockpit to fit you perfectly. You’ll ride with more comfort, better control, and less wrist or shoulder pain.
- Stem Length & Rise: A shorter stem can make steering more responsive. A taller rise on bars lifts your hands for a more upright, less strain-inducing position.
- Handlebar Width: Wider bars give more leverage on technical trails, while narrower bars suit tight singletrack or urban commutes.
- Grip Material & Shape: Softer, ergonomic grips cut vibration and reduce hand fatigue. Lock-on grips prevent slippage.


Before you buy handlebars and grips for your MTB, consider these questions first.
- Do the new stem and bars match your frame’s steer tube diameter?
- Will your chosen grips fit your bar width?
- Are you comfortable with the new reach and drop?
Whatever you choose, put your safety, comfort, and riding style before anything else.
Who This Serves: Riders with wrist or shoulder discomfort on long rides. If you feel numbness after 45 minutes, a cockpit tweak can fix that.

Saddles
Finding the best bike saddle for MTBs can eat up hours of your time—there’s a huge variety out there. Quality saddles improve comfort, reduce pressure points, and let you ride longer without pain. That’s why many riders list contact points (grips, saddles, pedals) among the top affordable upgrades to cut fatigue and boost control.


What to Look For in an MTB Saddle:
- Shape & Width: A wider platform supports sit bones on rough terrain.
- Padding & Rails: Gel or medium-density foam balances comfort and pedaling efficiency. Steel rails cost less but weigh more; titanium or carbon rails cut grams.
- Cutouts & Relief Zones: A central cutout can reduce pressure on sensitive tissue—great if you hate numbness.
To save you time, we have listed some of the best-reviewed MTB saddles here to guide you along. This selection includes features that are functionally designed for mountain biking. They are quality-made, high-performance, and comfortable.
Who This Serves: Riders who finish a 20-mile lap feeling sore or numb. If your tailbone aches after 30 minutes, a saddle upgrade will help.

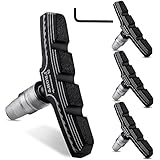
Brake Pads and Rotor
Upgrading your brake pads and rotors may not be the first customization you will think about. But it is certainly on the cheaper side. The quality of the brake pads and rotors you choose will have a significant impact on your MTB’s braking performance and durability.
Brake pads fall under two types – organic and sintered. Organic pads are quieter and bite harder than sintered ones. Sintered are noisy but perform a lot better under heat pressure. They are better choices for bikers who like to go mountain biking even under wet conditions.
Choosing the right rotors of your bike can also pose a dilemma. A larger rotor is more helpful if you are looking for more braking power and better heat management. On the downside, the bigger the rotor you choose, the heavier it will be.
A smaller rotor is more lightweight and offers better modulation but does not give you the best braking power.
To gauge the best rotor size for your MTB, you have to consider your physique, riding style, terrain, and how often you ride.
It will benefit you to choose what you think is the most reliable choice for you.
Brake Pad Types
| Feature | Organic (Resin) | Sintered (Metallic) |
|---|---|---|
| Noise Level | Quieter “bite” | Noisy |
| Initial Bite | Strong, immediate | Gradual, progressive |
| Heat Performance | Lower threshold (best for dry) | High threshold (wins in wet) |
| Wear Rate | Wear faster | Last longer in muddy conditions |


Rotor Size Guide
- Small (140–160 mm): Lighter, better modulation, less heat dissipation. Good for lighter riders or cross-country loops.
- Medium (180 mm): Balanced power and heat control. Ideal for general trail riding.
- Large (200–203 mm): Maximum stopping power, great for heavy riders or steep downhill. Watch weight penalty.
Who This Serves: Riders who sweat downhills and need consistent braking. If your pads fade on long descents, consider sintered pads and a 180–200 mm rotor.

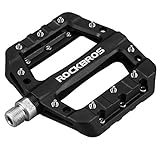
Pedals and Pins
MTB pedals come in two flavors—clipless and flat. Clipless ties your shoe to the pedal for maximum power transfer (most road racers use them). Flat pedals use pins that dig into your shoe’s sole, giving secure footing without the hassle of clipping in and out.
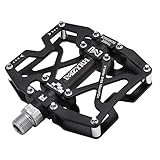

Flat Pedal Tips
- Material Matters: Nylon or fiberglass composites shave weight and cost less than aluminum or magnesium.
- Pin Choice: Look for replaceable pins with tapered tips. They grip your shoe better and avoid stripping threads.
- Platform Size: A large platform spreads your foot weight better—useful if you carry extra gear.
To find the most compatible combination for your MTB, try going for lighter versions. Go for pedals made out of lightweight materials like nylon or fiberglass. These perform as well as high-end ones at more affordable prices. If you think you need to replace your pedal pins, look for pins with adjustable height and tapered tips to reduce thread damage on your bike shoes.
Who This Serves: Riders who hit rock gardens or steep sections and need to bail quickly. If you value quick foot placement and no-slip traction, flats with quality pins win.

Cables
Your gear and brake cables don’t need a costly upgrade—unless they feel sticky or stretch over time. When shifting becomes sluggish or brakes pull spongy, swap cables and housing.
Your gear cables are part of your bike that does not need a necessary upgrade as long as it performs well. If you are not happy with them, they need to go, but if they work well, use them until they’re worn out. Only then do you need a necessary upgrade?
If you were okay with the factory default, you could buy them again. But if you want to go for higher quality, try the Shimano MTB Stainless Steel Gear Cable Set. It has a highly corrosive-resistant stainless steel inner wire for low friction and smooth shifting. A high-quality Shimano MTB stainless steel cable set cuts friction and lasts longer in wet, muddy conditions.
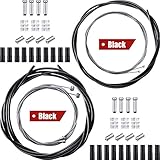


Signs You Need New Cables:
- Hesitation when you shift—sounds like “chatter.”
- Brake lever feels soft or spongy, even after bleeding.
- Visible rust or fraying.
Who This Serves: Riders who notice sluggish shifts on climbs or feel their brakes wheeze in mud. Crisp shifting and solid braking make every ride safer.

Dropper Post
A dropper post revolutionizes how you handle steep descents. You flip a lever, and your saddle drops out of the way—no stopping to adjust seat height. Riders who tackle unpredictable trails find a dropper post keeps them stable and centered, especially on rocky, root-strewn descents.
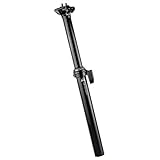


Benefits of a Dropper Post
- On-the-Fly Adjustments: Lower the saddle for descents without dismounting.
- Better Body Position: Move your weight back quickly to avoid going over the bars.
- More Confidence: You won’t slam your butt into the saddle when you break over large obstacles.
Considerations
- Internal vs. External Routing: Internal hides cables but requires frame prep. External often fits older frames.
- Travel & Diameter: Choose a post with enough drop (100–150 mm) to clear obstacles without bottoming out.
- Budget: Entry-level dropper posts start around $100, but reliable mid-range posts cost $200–$300.
Who This Serves: Trail riders who hit steep descents or enjoy jumping still steeper drops. If you rarely ride vertical terrain, a dropper may not add as much value.
This is a convenient upgrade for older bikes that do not have this feature. It is also one of the most satisfying and worthwhile. If you’re interested in purchasing a dropper, you can browse our selection of the best dropper posts in 2025 for your reference.

Brakes
High-performance MTB brakes let you push faster and descend steeper without fear.
Upgrading to a quality four-piston caliper and mineral-oil system can shave braking distances by up to 10% versus entry-level two-piston levers.
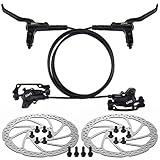

Brake Upgrade Tips
- Four-Piston vs. Two-Piston: Four-piston calipers give more even pad contact and better modulation.
- Mineral Oil vs. DOT Fluid: Mineral oil systems often require less frequent bleeding and are more user-friendly.
- Lever Reach Adjustment: Set your lever reach so your fingers rest comfortably, avoiding hand fatigue.
Who This Serves: Riders who push steep trails and need reliable brakes in mud, rain, and mixed conditions.

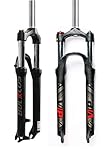
Suspension Fork
A new suspension fork can cost a few hundred dollars, but it often feels like you’ve bought a whole new bike. A quality fork soaks up bumps, keeps your front wheel planted, and gives you more control.
In one hands-on test, riders shaved an average of 10% off their lap times after switching from a low-end fork to a mid-range option with 120 mm of travel.


Pros & Cons of Suspension Upgrades
- Pros:
- Cushions impacts on rough trails.
- Improves front-end traction and cornering.
- Allows you to run wider tires more easily.
- Cons:
- Adds weight versus a rigid fork.
- Costs $200–$400 for a decent mid-range model.
- Requires periodic maintenance—air spring and damper service.
Who This Serves: Trail riders who face rock gardens, roots, and chunk. If you only ride smooth fire roads, a rigid fork may suffice.
We have shortlisted some of the best-tested and reviewed affordable suspension forks to make your riding experience better.
No matter how modest, a suspension upgrade will probably make a big difference in improving the setup, quality, and performance of your ride.

Drivetrain
Your drivetrain (shifter, rear derailleur, cranks, chainrings, cassette, bottom bracket, cables) moves your bike forward.
Upgrading cables, housing, and chain alone can restore crisp shifting and prolong drivetrain life. If you want a bigger jump, consider swapping to a modern 1×12 groupset from Shimano or SRAM.


Key Drivetrain Upgrades
- Cables & Housing: Low-friction stainless steel cables cut drag, making shifts instant.
- Chain & Cassette: A 12-speed cluster gives you tighter gear steps and wider range, ideal for steep climbs.
- Rear Derailleur: A clutch-equipped derailleur keeps chain slap at bay on bumpy trails.
- Shifter: A precise 12-speed shifter lets you shift under load without misfires.
- Crankset & Chainring: Wide-narrow chainrings reduce chain drops. A lighter crankset saves grams for faster acceleration.
Who This Serves: Riders whose shifting chatter or dropped chains steal focus. If your stock drivetrain shifts smoothly, you may only need cables.
Key Statistics and Facts from Research Articles on the Best MTB Upgrades
| Upgrade Type | Key Benefit(s) | Affordability | Notable Statistic/Finding |
|---|---|---|---|
| Tires (Tubeless) | Grip, comfort, puncture resistance | High | Most effective, affordable upgrade |
| Wheels | Handling, speed, durability | Medium–High | 29% say most valuable upgrade |
| Contact Points | Comfort, control, power transfer | High | Reduces fatigue, increases enjoyment |
| Drivetrain (Cables) | Shifting performance, drivetrain life | High | Restores crisp shifting |
| Suspension | Terrain handling, adjustability | Low | Expensive but major performance boost |
Conclusion on the Best MTB Upgrades
Cyclists love upgrading their bikes. It is a gear-intensive activity, so it is inevitable for upgrades to happen along the ride. Some upgrades are worth every penny you spend on them. Others, not so much. It is the experience that matters more than getting on board the ‘latest trendy upgrade.’
Buy the best quality upgrades you can comfortably afford, and make them last. If you match upgrades to your riding style—whether that’s daily commutes or weekend trail missions—you’ll see real gains in comfort, control, and speed.
References
Lebel Bicycles. (2025, January 27). The 8 best upgrades for your bike (MTB, road, gravel) in 2025. https://lebelbicycles.com/blogs/bikes/best-upgrades
Singletracks. (2024, June 11). The one major MTB upgrade that makes the biggest difference and the ones that don’t. https://www.singletracks.com/mtb-gear/the-one-mtb-upgrade-that-makes-the-biggest-difference-and-the-ones-that-dont/