Key Takeaways
- Learn how to fix a bike chain quickly on the trail or at home with minimal tools.
- Essential tools include a chain tool, quick links, and cleaning solvent.
- Step-by-step instructions cover removal of damaged links, reconnection, tension adjustment, cleaning, and lubrication.
- Maintenance tips and troubleshooting advice help prevent future breaks.
- Most chain problems are a drop, a break, or skipping.
- If parts look bent or the chain jams in the wheel, stop and get help.
How to fix a bike chain is a common “bad timing” problem. It can happen on a commute, a group ride, or a short fitness loop.
It doesn’t have to be daunting—even if you’re miles from home.
What exactly is a bike chain, and how does it break? The bike chain is an integral part of any bike, and the bike will not function if you do not get the chain fixed or replaced. Your budget might not allow you to get a new one, but you can continue to use it.
Need a Few Practical Extras for Your Next Ride?
Browse cycling-related clothing and simple bike accessories that may help with comfort, visibility, storage, or everyday riding.
Paid links. As an Amazon Associate we earn from qualifying purchases.
This blog will look at how to repair a broken bike chain. We’ll also discuss what a bike chain is and why they break with surprising force.

Quick answer
To fix a bike chain, first check what happened: it fell off, it broke, or it skips under hard pedaling (hard pedaling = pushing very hard on the pedals). If it fell off, put it back on the gears and pedal by hand. If it broke, remove the damaged link with a chain tool and reconnect with a matching quick link. If it keeps skipping, check chain wear and plan to replace the chain.
What changes the best fix?
- Bike type (single-speed vs geared)
- Link type (quick link vs connecting pin)
- Dirt/rain (grit can speed up wear)
- Chain wear level



What is a Bike Chain?
The chain consists of a collection of links with pins, plates, and rollers. It connects front and back gears, allowing you to pedal. If your chain snaps, you can’t go anywhere.
Why Chains Break
Chains fail when:
- The pin connecting links wears down or breaks off.
- Side plates bend and release rollers.
- Overuse: Frequent riding causes wear; even high-end lubricants like WD-40 can only delay failure.
- Water damage: Corrosion from rain or puddles eats away link integrity.
Regular tune-ups—at home or your local shop—help catch wear before disaster strikes.

How Does a Bike Chain Work?
When you pedal, your legs move back and forth. These movements create tension in the chain, causing them to move past each other. This is why riding uphill or downhill makes pedaling harder!

How Do Chains Break?
It’s a simple question, but it’s more complicated because many variables exist. In general, chains fail when:
- The pin connecting one link to the following breaks off
- The side plates that hold all the parts together (including the rollers) bend out of shape and let go.
Overuse
Another common reason why chains break is over usage. If you ride your bike frequently, overuse could cause your chain to wear down. Using high-end lubricants like WD40 can help prevent this but eventually will fail!
Also, make sure you keep your bike in good shape. You should have regular bike tune-ups done at a local bike shop or by yourself with tools purchased there.
Water damage
If water gets into your chain, corrosion can build up over time. This can cause metal parts inside the links to corrode away from each other (leading them to separate). This damage often happens during rainstorms or when riding through puddles on sidewalks.

What You Need
A chain tool is a pair of pliers that you attach to both sides of the broken chain. When the two pieces are held together, it’s easy to unscrew one side and separate them.
If you are out on the road or trail and your chain breaks, you will need to replace it. If you have a replacement chain with you, great! If not, you will need to repair the one on your bike.
On the street, it’s possible to repair a chain with nothing but a hammer and pliers. You can also do it bare hands! But a chain tool makes the job much easier.
Before we start, consider the following:
A) You can repair a chain wherever you want, as long as it is not moving. You don’t need to separate it from the bike, but feel free if you’re going to do so for convenience.
B) The most common cause of a snapped chain is when the sprockets wear down and become undersized.
C) If your chain has broken in the middle of nowhere, make sure the bike is not moving before you begin working on it.
Tools Needed for Bike Chain Repair
Make sure you have:
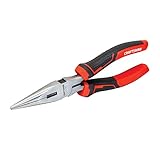
- Needle-nose pliers and an adjustable wrench
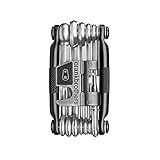
- A chain tool (often included in multi-tools)
- Quick links for fast reconnection
- Cleaning solvent (citrus-based degreaser works best)


Step-by-Step Repair Guide
1. Identify the Issue
The most common cause of a broken bike chain is that the links have come apart. The pins that hold them together have broken off from their respective links.
You can check this by looking at either side of any two links. After that, check if there are small holes where the pin was once connected. If so, you’ll need to replace those pins before proceeding with your repair attempt.
2. Check for Damage and Wear
Flip the bike upside down for easier access.
Look at the bike chain for any clear signs of damage, such as kinks in the links or broken links. Finally, replace any damaged parts before moving on to other tests and repairs.
To check the wear on your chain, take off one of the links and look at the inner side. If you can see grooves in the metal, then it’s time to replace that section of your chain.
3. Clean the Bike Chain
Once you’ve removed the chain from your bike, it’s time to clean it. You’ll want to use a brush or toothbrush and degreaser to scrub off grime and dirt on the outside of your chain. Then use a rag or cloth to dry off any excess liquid. You can use a hard-bristled tool to scrape away those spots for stubborn areas. Don’t apply too much pressure here!
Once you’re finished cleaning up all visible dirt, take some WD40 and spray down both sides of each link. It would be best if you then reassembled everything by reversing these steps in order:
1. Put on new links at both ends using an adjustable wrench
2. Place them into position using needle-nosed pliers
3. Fasten them with one end attached first, followed by the other end last
4. Turn clockwise until tight without forcing anything further than needed!
4. Loosen the Nuts to Remove the Old Bicycle Chain
Once you’ve loosened the nuts, you can now remove your old bicycle chain.
If you have a chain tool, use it to loosen the middle link on one side of your bike and remove the chain from inside that link. Then, pull your old bicycle chain through this opening to get it off completely. You can also use an appropriate hex wrench to loosen both sides of the middle link. This way, only half of it is still connected to your gears.
If you don’t have any way of loosening these nuts without damaging them use a chain breaker instead. To do this, pry open one side where there’s still some grip left between two links on opposite sides. It should cause enough tension to pop out and separate them.

5. Connect the New Chain to your Bike
To connect the new chain to your bike, you need a chain tool. Other tools are available at most bike shops instead if you don’t have one and are in a pinch for time or money. Before connecting the new chain to your bike, make sure it is free of debris and dirt.
Use a chain whip to combine two ends of a bicycle’s drivetrain. It loops them through each other to be connected with an Allen bolt or pin. The whip has two ends: one with an open hook and an open eye. They’re both made of metal wire to not bend when pressure is applied during assembly.
6. Lubricate for Longevity
Apply a drop of high-quality bike lube to each roller, pedal backward to work it in, and wipe off drips to prevent grime build-up.
7. Tighten the Nuts Securing the Chain
The last step on how to repair a broken bike chain is to tighten the nuts, but you must not over-tighten them. You can use a chain tool, multitool, crescent wrench, or ratchet to do this job.
A broken bike chain is a serious problem that needs to be fixed quickly and easily. Fortunately, setting a broken bike chain is simple. You can buy a new bike chain and fix it yourself or take your bike to a professional repair shop and have them do it for you.
There’s no reason you can’t learn how to repair a broken bike chain! You only need accurate information, basic supplies, and elbow grease (or maybe a friend or two).
If your chain stretch exceeds 0.75% (use a wear gauge), or multiple links show corrosion/grooves, replacement is safer than repair.
How to Fix A Bike Chain: chain fell off (drop)
- Shift to the smallest rear gear (small cog).
- Put the chain on the front gear (front ring).
- Put the chain on the rear cog.
- Lift the rear wheel and pedal by hand.
- Watch the chain. It should run straight and quiet.
If it drops again right away, jump to Quick fixes below.
How to Fix A Bike Chain: chain broke (get-home repair)
Park Tool calls many roadside chain repairs temporary. Plan a full check later.
- Shift to the smallest rear gear.
- Find the broken or twisted link.
- Use a chain tool to push the pin out and remove the damaged link.
- Reconnect the chain:
- If you use a quick link: put each half on the chain ends, join them, then pull tight to seat it.
- Direction note (Shimano quick links): place the arrow in the crank rotation direction when viewed from the front.
- If you use SRAM PowerLock: SRAM states it is designed for one-time use only and must not be reused.
- Pedal by hand. Watch the repaired spot pass through the derailleur.
Important: Removing damaged links shortens the chain. This can limit which gears you should use until you do a proper repair.
How to Fix A Bike Chain: chain skips (jumps under hard pedaling)
Skipping often comes from wear, dirt, or a shifting issue.
- Check for a stiff link and flex it gently side-to-side.
- Clean and lube the chain if it is gritty.
- Check chain wear with a wear gauge. Park Tool shows common gauge steps like 0.5% and 0.75% and explains why early replacement helps protect gears.
- If wear is high, replace the chain soon.
- If a new chain still skips, the rear cogs or front ring may be worn too.

Frequently Asked Questions
Can I fix a snapped chain without tools?
You can use pliers and a hammer for a temporary fix, but a proper chain tool ensures safety and longevity.
How long does a repaired chain last?
A single-link repair should hold for 100–200 miles; replace the chain for reliable long-term use.
What if my chain tool won’t push the pin?
Lightly tap the tool’s handle with a mallet to seat the pin pusher—avoid excessive force.
Conclusion on How to Fix a Bike Chain
Learning how to fix a bike chain empowers you to handle roadside repairs confidently, keep your ride smooth, and enjoy every adventure without interruption.